Posted on

We Have a Winner & a Finish!

Wowee!! Thank you so much to everyone that stopped by my blog for the Sew Mama, Sew Giveaway. I had well over 600 comments and many of you felt my blog was interesting enough to start following it. I really appreciate that. I used random.org to pick a winner on Friday, and have contacted them. The big winner was Leah, who had this to say:

“My most treasured quilting tool is my rotary cutter for sure. We are the best of friends, spending almost every day together. She has only nicked me once and I forgave her. After all, we are BFFs :)”

Congratulations!! The awesome thing is that Leah was actually comment #1 on my blog!! Who says that being the first to comment means you won’t win? I will be sending your prize out tomorrow Leah!

So this weekend was Memorial Day weekend. My husband was in the military, so we always take time to remember those men that we knew that have fallen. We are very blessed that many of the men we were friends with are safe at home with their families now, but sadly a few were not so lucky. If you didn’t take the time to silently thank our soldiers yesterday, please try to remember to do that today.

It was a pretty productive weekend for me actually. Since I got back from MQX, I have been bound and determined to figure out the problem with my longarm machine. I was having issues where it would freeze up and completely stop if I slowed down too much while sewing. This, of course, really makes it hard to have sharp points, because you have to slow down a bit to get those. Additionally I was having lots of issues with eye-lashing thread on the backs of my quilts. This is very frustrating as I purchased the machine with the hope of quilting for others eventually, but if I can’t get these issues fixed, there is no way I would put anyone else’s quilt on there!

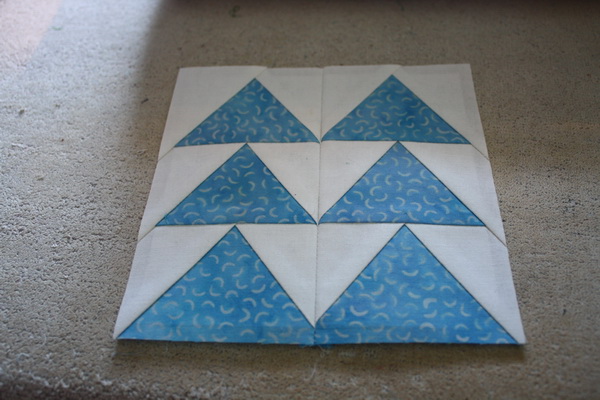
So I sat down on Saturday and did some research on Google to see if I could find some fixes. There were a few suggestions for the whole stopping when I slow down thing, which I did. Then for the eye-lashing, I pulled out my new tension gauges and figured out how to check the proper tension for my top and bottom threads. I put in a new needle, and crossed my fingers. I threw a quilt that my son helped me create and just went to town.

I was super surprised to find that all my issues were fixed! The machine still has a little bit too much vibration, but I think that may be because my table isn’t quite level.

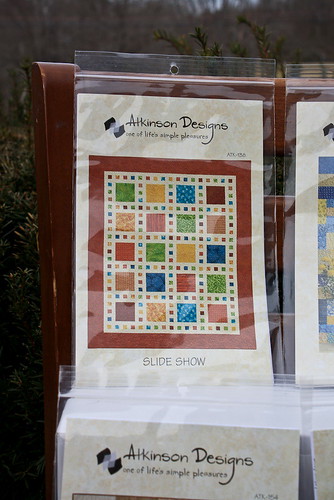
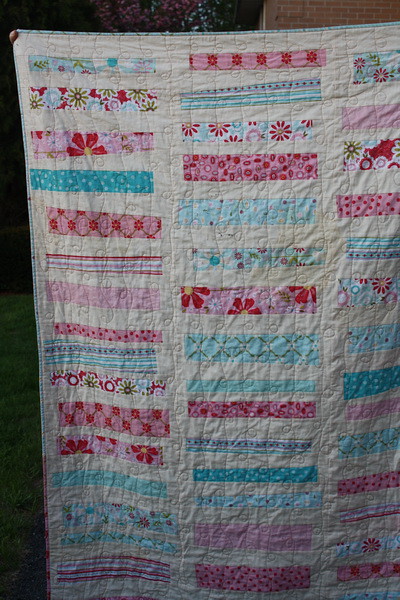
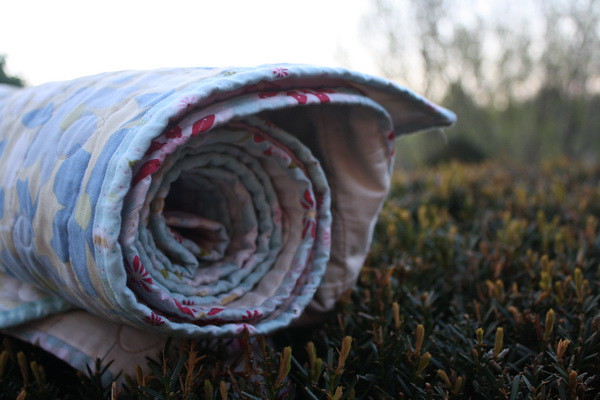
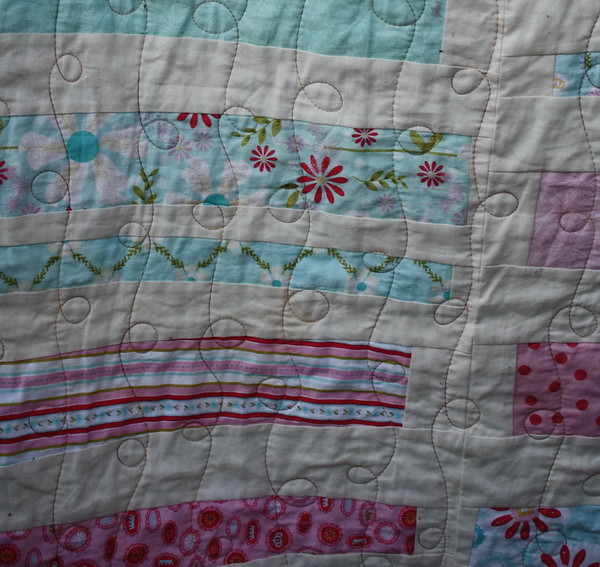
For the quilting, I tried a simple design that I learned from my MQX class. I was able to get pretty sharp points, and when I slowed down to make them, the machine kept plugging along. I need to work on slowing down overall to help keep my stitches more consistent, but I am very excited for what I have already been able to do!

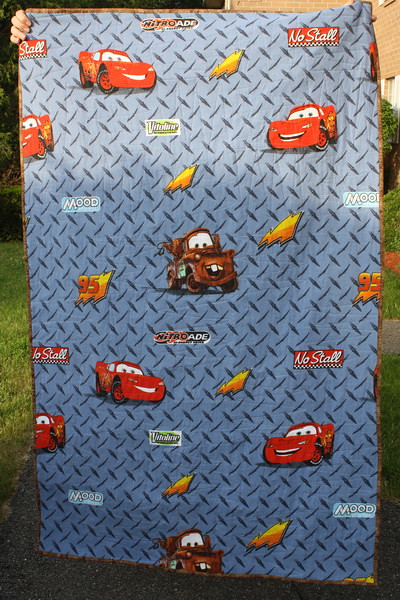
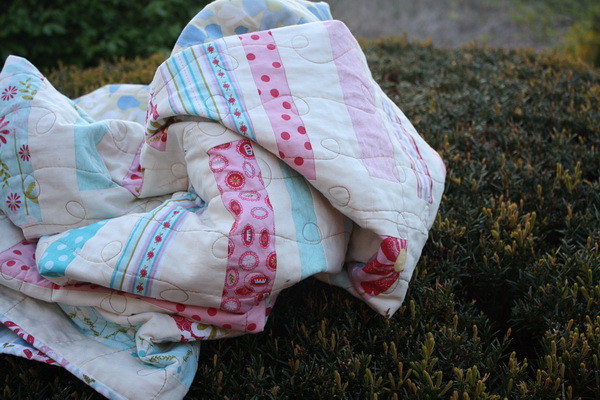
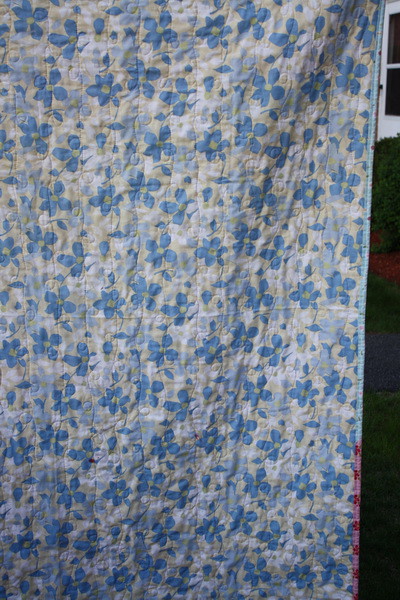
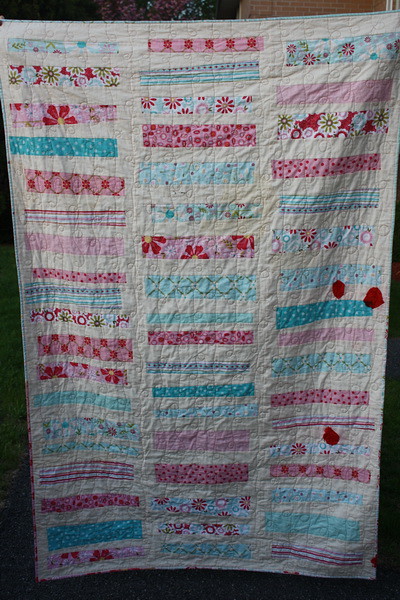
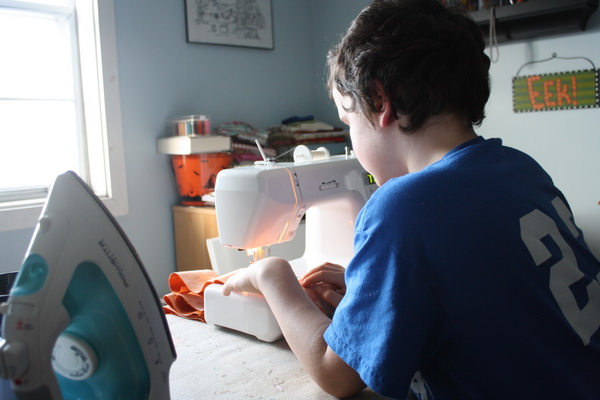
This is the back of the quilt, I know many people would think I am crazy to put ‘Cars’ on the back of this beautiful front, but this is 100% my son’s quilt. He picked the fabric for the front, he picked the pattern, I made the blocks themselves, but he did the placement of them. So he got to pick the backing, and he picked this cars sheet I picked up from a thrift shop.

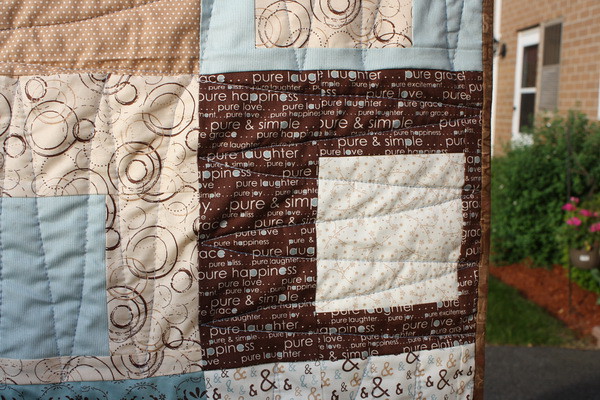
I went with a simple brown fabric for the binding. I figured that would help keep the front looking nice and separate it from the backing.

Seeing the backing and the front together does make me cringe and smile at the same time. It makes me cringe because it is such a beautiful, grown-up front, and the back is such a kid-quilt backing. But it makes me smile too because it is just so my son to combine these two things.

I am still practicing on my quilting, but I have my meander down pretty good. I am hoping to be able to offer my services to others pretty soon. I will probably just focus on doing a simple meander for people, which will keep the costs really low. I will keep you updated on this if anyone is interested in my services.

Happy Quilting!
Rachel

Posted on 1 Comment

Random Bookmark of the Day

Last night I was perusing some of my bookmarks in vi.sualize.us. If you have never heard of that site, it’s similar to the newly popular Pin It site (can’t think of the name right now), but has been around for years. You can use the site to keep track of web bookmarks using one picture from the page. I really enjoy using it as it gives me a nice visual of ideas. I thought it would be fun to use a random number generator to pick one of my bookmarks/pictures to share with you. I have a lot of quilty stuff in there, as well as scrapbooking and cooking, so it’ll be fun to see what gets picked to share.

So I have 442 pictures saved in my account. Using random.org, it told me to share picture number 167 with you. So here it is:

Well isn’t that just darling?? This is a funny picture from i can has cheeseburger. I have this blog in my feed reader for when I need a little giggle. Usually this site puts funny captions on pictures of cats, but this one was so random I found it quite amusing and decided to bookmark it!

I hope you are having a great Friday! You should take a browse through your own bookmarks today, you never know what amusing things you might find! (If you find something totally random, feel free to share it here with us!)

Happy Quilting!
Rachel

Posted on 629 Comments

Sew Mama, Sew Giveaway Day!

Today is the day! If you have never taken part in Sew Mama, Sew’s Giveaway Day before, you are in for a treat. Tons of bloggers will be posting giveaways today, in the spirit of friendship and kindness. You should totally check out all the offerings, but I assume you would like to see what I am offering before you do!

Today my giveaway includes two items, the first is a pattern that can also be found in my online store (here). It is called “Slideshow” by Atkinson Designs.

I haven’t actually tried this particular pattern myself, but if the “Yellow Brick Road” pattern is any indication, her patterns are excellent! Her directions are clear, concise, and very easy to follow. This should be an enjoyable pattern to make.

The second item included in my giveaway is this fat quarter bundle from my own personal fabric stash.

This bundle is made up of 11 fat quarters from Denyse Schmidt’s new line of fabrics, “Picnic and Fairgrounds”. One lucky winner will get both the pattern and the fat quarter bundle. These fabrics are simply divine and I think this will be a great pattern to show them off.

All you have to do to enter this drawing is leave me a comment. Easy as that! To make it fun, you can tell me what your most treasured, or most wanted, non-fabric quilting tool is.

If you are new to my blog, I am the owner of a new online shop called Dewberry Lane. We specialize in all your non-fabric quilting needs. The store just opened in mid-April, and May is our official Grand Opening month! You will find that most of our prices are currently 10% below retail. That may not last forever, but our newsletter will keep you up to date on all our specials and new items in store. If you sign up for our newsletter, our subscribers are entered into a drawing for a free pattern each month.

To celebrate my new store, I am going to allow for extra entries into this giveaway as well. Just let me know that you have done (or already do) any of the following, and you will get one bonus entry per item:

1. Sign up for the Dewberry Lane newsletter (here, left-hand side)
2. Follow Dewberry Lane on Twitter (here)
3. Follow this blog (Using Google friend to the right, or any other feed reader, just let me know what you use.)

This allows each of you a total of 4 chances to win this fun prize! I am also happy to ship internationally.

I hope you enjoy all the wonderful giveaways today, I know I will be hopping around and entering as many as I can! Be sure to check out the full list here.

Contest is now closed!! I will make a new post announcing the winner very soon. Thanks everyone!!

Happy Quilting!
Rachel

Posted on

Quilting? What’s That?

Hello out there in blogland!! Today is such a dreary day outside, that I wanted to share some of my latest quilting projects with you when I realized I haven’t really been quilting lately!! I do have quite a few older projects I need to post (which I will do eventually), but between getting ready for my son to homeschool, the new quilt store, my full time job, another online business I run, a non-profit I am vice-president for, oh and being with my family, well something had to give. Sadly it was my quilting time. I have done a tiny bit of applique on my “Family Reunions” quilt, but that’s pretty much it.

Speaking of homeschooling, I think we have finally settled on a style we are going to loosely follow. It is called the “Thomas Jefferson Education”. It’s not so much a way of home schooling, but an ideal. I really like the concepts behind it, and have found some great reading materials on how other families have implemented this in their homes. You can read more about TJed at www.tjed.org if you are interested.

I wanted to take a moment to thank those of you that took the time to comment on my last homeschooling post. Your words of encouragement mean so much to me as I go on this journey. Each day we get closer to D-Day (or would that be H-Day? LOL), I am more at ease about the process. But it is still a little intimidating to think about all the possibilities, worry about meeting new people, and making sure I don’t screw the whole thing up! So your kind words really help me know that this is the right choice, and we will be fine. So thank you.

In other exciting news, my husband and I like to mark big changes in our lives, with a fun trip. Last time we had a big change we went to Gettysburg, and this time we are going to see this guy ….

Yes, we will be going to Disney World! Yay!! I am so excited! This will be my and my son’s first time going. My husband has been before, but not for quite a while. We are taking advantage of one of the free dining offers that Disney did for 2011, so the cost is really reasonable. We are going for a whole week, so there will be plenty of time to take in all (some? very little?) of the sights. It will be just the right thing to mark the beginning of this big change in our lives.

Sorry for my ramblings today, hopefully you will find my next post more exciting! I am participating in Sew Mama, Sew‘s Giveaway Day. Be sure to check back on Monday for all the details and a fun giveaway. I haven’t decided on a prize yet, so if you want to check out my store (here) and tell me what you’d like to see as a giveaway, I may be obliged to listen.

Happy Quilting!
Rachel

Posted on 56 Comments

Online Quilt Festival

If you are new to my blog, welcome!! If you have been here before, thank you for visiting again!! Today I am very glad to be participating in the bi-annual online Quilt Festival hosted by Amy’s Creative Side.

All around the web, quilters will be posting pictures of a quilt they have made and sharing the story behind it. They then post the link to their quilt on Amy’s blog, and are entered into a drawing for a chance to win some pretty fabb-o prizes from Amy’s sponsors. I am happy to say that Dewberry Lane is one of Amy’s proud sponsors!

We have donated 2, $25 dollar store gift certificates, which you could win! Just visit Amy’s blog to see all the details.

Dewberry Lane is a brand new online store that specializes in all your non-fabric quilting needs. May is our Grand Opening month! We are hosting all kinds of giveaways around the interwebs, so if you want to be kept up to date on those, be sure to follow this blog.

We also have a newsletter that helps keep you up to date on our specials and new items in the store. You can sign up for the newsletter on the left-hand side of the store itself … (Click here). All of our newsletter subscribers are automatically entered into a monthly drawing for a free pattern every month, so be sure to sign up for a chance to win!

We also have a coupon code that is good for 10% off! Just use Festival when checking out.

Now on to the good stuff! My quilt.

This is a very special quilt to me. I normally only make quilts for my husband and my son, so there aren’t very many chances to use pink. When I won this stunning Riley Blake fat quarter pack from Stash Manicure, I knew I had to make something special for myself.

Finding just the right pattern to show off those fabrics was not easy. I have been saving this one in particular pattern in my files for some time now. It is a free pattern from Ashley of Film in the Fridge called Unfurnished.

It had all the elements I wanted, a little bit wonky, easy to make, and it would show off the fabrics perfectly. I was able to whip this quilt top up in less than 2 days. Here is the finished top:

With the leftover fabric, I even made a few little bags to hold some Halloween treats.

It took me about 4 months to actually do the quilting on this top. I had it on my longarm, but I just didn’t have the time to actually finish it up. In February, I finally said enough was enough and I chose a simple quilting pattern, which finished up in less than 2 hours. I just chose to do lines of loops for this one. I really like how it looks with the vertical dimensions of the top.

The backing was a beautiful sheet I found at the thrift shop, I love this fabric so much. I think it fits the quilt perfectly.

I only got to use the quilt for about a month before my son claimed it as his own. He has an obsession with blankets and quilts and isn’t too picky about what they look like. Unfortunately he also decided to use a marker one day and left the cap off right on my quilt. So now I have these lovely red splotches of marker on my quilt. Luckily it’s washable marker, so it should come right out (I haven’t had time to actually do it yet), but it makes me cringe every time I look at it.

I hope you had fun looking at my quilt. Be sure to hop over to Dewberry Lane and sign up for our newsletter to be entered into our monthly drawing for a free pattern! Don’t forget to use the coupon code Festival while you are there, to get 10% off.

Happy Quilting!
Rachel

Posted on

Giveaway Winner and New Items in Store!

I realized this weekend that I had never picked a winner for my “Back in Business” giveaway!! I am very sorry for the delay in that, I got so wrapped up in my P.S. I Quilt giveaway that it slipped my mind. 🙂 I picked a winner using random.org though, and Judy Purcell is the lucky winner!! I have been in contact with her, and will be sending out her Darcy pattern very shortly.

I also sent out the May 2011 newsletter for the store. Every month I will pick a newsletter subscriber to win a free pattern, so be sure to sign up for a chance to win! The newsletter will help keep you up to date on all the fun things happening at Dewberry Lane. You can sign up for our newsletter right at the store, on the left-hand side. This month we gave away a High Street Messenger Bag pattern by Amy Butler. The winner was chosen and contacted and her pattern is going out in today’s mail.

Be sure to keep an eye on this blog in the coming months as I am hosting a few different giveaways on popular quilting blogs around blogland. I will post here when they are live with a link of where to go to participate. You don’t want to miss out on the prizes!

I also wanted to take this chance to tell you about some new products we have up in the store.

If you have never seen Kate Conklin’s designs, you are going to be in for a treat. I have to say that as I uploaded each pattern into the store, I was dreaming of the fabrics I would choose for each one. Even the heart applique one, which is a bit beyond my normal quilting. All of her patterns are so pretty and inspiring. The best part is, they are downloadable! No shipping costs, no stalking the mailman. Just pay, download and get to sewing that very day. Be sure to check them out! (click on any of the images to be taken to the store)

Happy Quilting!
Rachel

Posted on 5 Comments

Paper Piecing with Freezer Paper

Today I am going to talk about a little known form of paper piecing. I do not claim to be the originator of this method in any way, shape, or form. I first saw the method demonstrated on the Twiddletails website when I jumped into her Geese in the Forest paper piecing quilt pattern. I have shown my progress on this quilt here before, but I am enamored with this quilt.

I am not sure if she is the originator of this paper piecing method, but this is how I do all of my paper piecing now. Even my Dear Jane blocks get done in this method. I love it!! I am going to do a tutorial for you today. My method is slightly different from the tutorial I saw on Twiddletails. I hope you like it enough to give it a try as it’s really not that hard, and you will discover so many benefits over the traditional way of paper piecing (which I will point out as we go).

Before you get started, you need freezer paper. You can find this at the grocery store in rolls. That is what I used when I started, but then I discovered this stuff:

This is freezer paper that is cut into sheets that fit in your printer. In my tutorial I used the rolls because I didn’t have any of this on hand when I was taking the pictures (a few months ago actually). But let me tell you, this pre-cut stuff is well worth the slightly added cost. Trying to tame the curled paper to fit in your printer is no treat. We do have this in the store of course, C. Jenkins Freezer Paper, and it is 10% off retail right now.

Once you have your freezer paper, you will want to print your pattern right on there. Be sure to print on the papery side, not the shiny side. Any ink-jet printer will work (laser printers will work too, just use Google to find directions), as the papery side is just like normal paper. If your block is directional, please remember that your block will be a mirror image of what is printed, so if the pattern has not already done it for you, you may need to use an image software to flip your design before printing. Once printed, cut the pattern out on the seam line. Follow your pattern instructions to determine where else to cut, you are not cutting out each individual piece, just the blocks that will be paper pieced together.

Now I pick out my pieces of fabric for the block, I usually rough cut the shapes of each piece leaving a generous seam allowance.

You can see that I have cut down the line in the middle of the block. This is specified in the instructions for the block. Some blocks will have no extra cuts, some will have a few, just be sure to follow your pattern.

In these pics you can see that I have hand written numbers on the pieces. This corresponds to the fabric I will use. You certainly don’t have to do this part, but it does make it a lot easier to keep everything in line while you are piecing. The printed numbers are for the actual paper piecing, they will tell us what order to sew in.

Take your fabric piece number one, and lay it right side down under spot number one. The wrong side of the fabric should be touching the freezer paper. Make sure to leave at least a 1/4 inch around all the sides. Iron the freezer paper to the fabric. Try to only iron in the number one spot, it will make doing the rest of the block so much easier.

Fold along the line between the number one and number two spot. You should be able to see your lines easily through the back of the freezer paper.

Pick your fabric piece number two up.

This part is where we come across one of the benefits of this method of paper piecing over traditional paper piecing. With regular paper piecing, you have to place the piece of fabric on the opposite side of where it is going end up, so it is kind of a guess as to the size of the piece of fabric you need, especially with something like triangles. This can be such a waste of fabric in the long run. With this method, the piece you are filling is folded back to the right spot, so you can hold your piece up to the light and line it up perfectly. This allows you to cut pieces that are close to the correct shape and waste less fabric.

Place piece number two behind piece number one with right sides together. You can see where piece number two is folded in front, and the fabric itself is placed perfectly to fit it. We will be sewing along the folded edge of the freezer paper.

You can start sewing at the beginning of the fabric, and sew right along the edge of the folded edge of the freezer paper (do not sew through the freezer paper, just right next to it).

This is where we have another benefit of this method over traditional paper piecing. You do not have to stop when you reach a line. Since we are not sewing through the freezer paper and are folding the freezer paper back, there is nothing in the way of our sewing. You start at the beginning of the two pieces and sew all the way to the ends of the fabric, you don’t have to stop at the end of the freezer paper, just continue the straight line off the fabric.

Because you are going to the end of the fabric, you can actually chain piece these blocks, you can see here I went to the end of my first piece and then slid my second one under the needle behind it.

This makes the blocks go much faster and is much easier than the “stopping at a certain line” method of traditional paper piecing.

Once your line is sewn, you want to trim for your quarter inch seam. Just line the quarter inch line of your ruler up on the seam (folded edge of the freezer paper) and trim to a quarter inch.

Unfold the freezer paper and fold the fabric for piece number two back into place. Iron the piece to the freezer paper, making sure to iron only in spots number one and two.

Next fold along the line between spot number one and three, and repeat all of the above steps. Continue on in this way for each spot.

If you have multiple pieces for the block, you will need to join them together now.

First trim around all the block edges, lining the quarter inch line of your ruler up to the edge of the freezer paper. Trim your quarter inch seam.

Now lay the two pieces right sides together, if you trimmed properly, you should be able to line the top and bottom of the pieces up and have accurate results. Pin the pieces together in the seam allowance.

Sew right along the edge of the freezer paper. If everything was lined up right, you should also be sewing along the edge of the freezer paper on the bottom.

Open up the block and iron the seam. I ironed this one open since there is a lot of bulk.

Turn your block over and admire your work.

The freezer paper on the back can now be peeled off. This is another added benefit to this method. With the traditional paper piecing, the stitches are sewn right through the paper, which can make getting the paper off hard and possibly stretch the block. With this method, there is nothing sewn through the paper so the freezer paper will peel right off of the back without distorting your block.

You may want to use Google to find a simple, free pattern for paper piecing. Any block that can be done with traditional paper piecing can be done with this method. I find this method to be so much easier than the traditional method and I think, once you try it, you will too.

Happy Quilting!
Rachel

Posted on 9 Comments

Big News and a Giveaway!

Yesterday my emotions ran the gambit of utterly elated to completed frightened. It was quite a roller coaster to say the least. Since my husband got out of the Marine Corps, our family has been of the dual income kind, however starting on July 31st this will no longer be the case. Yesterday I walked into my work and submitted my resignation. It was very difficult to do as I truly enjoy my job, the company, and the people I work for. But our family path has started to head in a new direction. We just feel that our son needs to be home-schooled, even if it is just for a year. He needs the space to spread his wings and grow into himself without all the rules and restrictions that are necessary in a public school. This will not be an easy time, the budget will be small, but the rewards will be huge. I cannot wait to spend more time with this amazing kid.

So that is my big news for today. It may not be big to other people but to us, this is huge!! It will be a journey for sure, but like everything else we have done in our lives we will figure it out as we go. But now I want to tell you about the giveaway part of this blog’s title!

For the next couple months I am a sponsor on Rachel (great name! :)) Griffith’s blog, P.S. I Quilt. If you haven’t seen her blog, be sure to head over there and check it out, especially today! Rachel is hosting a giveaway in honor of my new store Dewberry Lane.

Up for grabs is a pack of CuttingEDGE rulers. I have been using these rulers for a few months now and I love them!! It took a little adjusting to get accustomed to using a new ruler, but now that I have worked out all its quirks, I adore how it really sharpens my blade as I am cutting. I haven’t had to put a new blade in since I have started using it, and I can still easily cut through 6 layers of fabric!

The giveaway is a $75.00 value and includes the following rulers:

12.5″ x 12.5″
9.5″ x 9.5″
6.5″ x 12.5″
6.5″ x 6.5″
4.5″ x 4.5″

A nice variety of sizes to fit all sorts of quilting needs. Be sure to head over to Rachel’s blog to get an entry!

Ruler Giveaway

So does anyone out there in blogland home-school? Any tips or advice? I have 3 months to get a plan together, find a group and convince myself that this was the right decision to make. 😮

Happy Quilting!
Rachel