Posted on

First of My Bee Creative Blocks

I have mentioned before that June is my month for the Bee Creative Swap I am in. I sent all my fabrics to the other 11 partcipants at the very beginning of June, and posted my instructions for them. I basically gave them free reign of the fabric, the only thing I don’t want is a traditional block.

Tracy was the first one to finish her blocks. Here they are:

They look great!! I cannot wait to see everyone’s blocks all together.

Happy Quilting!
Rachel

Posted on

Buttercup Bag

When I made my big Bow Tucks Purse I also made two smaller purses to go with it. I never showed the pictures here, so I figured I would take the time to do that today.

The Buttercup Bag was super simple to make, you only need two fat quarters. You can find the pattern for these on the made by RAE blog. I chose to leave the buttons off and I added a magnetic snap. I adore it!! Here are my pics:

I also made this bag in a sock monkey fabric. I keep that one with me all the time in the larger purse and I like to pull it out when I am going somewhere and I don’t want to carry my big purse, but I still want to have my keys and wallet with me.

Happy Quilting!
Rachel

Posted on

Log Cabin Quilts

A few months ago I was thinking about a quilt I would like to make. About 7 years ago I saw this awesome log cabin quilt book where the log cabins were put together in such a way as to create an actual picture. Here is an example of what I mean:

I thought this was such a neat idea, but at the time just didn’t have the skills to make something like that. So as I was thinking about this not too long ago, I decided I wanted to track that book down and see if I still wanted to try those.

With some help from the Quiltingboard, I found the book on Amazon. You can see it here:

I actually do not believe I still have the quilt set to make one of these, but I hope to get this book soon and maybe give it a try. This is the particular quilt that caught my fancy 7 years ago:

For now it’s just on my someday list, which is getting very long!! But be sure to check out that book, it is a really neat book and I think anyone would have fun making quilts from it!

Happy Quilting!
Rachel

Posted on 1 Comment

Bee Creative May Swap Blocks

Last weekend I sat down and finished up Lori’s blocks for May. She wanted a modern log cabin. These are my blocks for her:

DSC00762

DSC00763

I had a lot of fun making them, I hope Lori likes them!

Coming up for the Bee Creative swap is June, which just so happens to be my month! Yay! So I have sent out my fabrics to all the girls and I can’t wait to see what I get back!! I will do another post soon with my fabric selection.

Happy Quilting!
Rachel

Posted on

Pictures coming soon!

Recently my camera broke. This was a very sad day for me as me and my camera are besties. I had a little Canon Point and Shoot and it was sweet. But alas, I dropped it and it is no more. We had been saving up some money to get my hubby a new TV and blu-ray player, and lucky for me there was enough in there to get me a camera or two as well!! Woo-hoo!! I will post soon about which camera(s) I got and I will get pictures up of all my recent quilty goodies too.

Happy quilting!
Rachel

Posted on

Swap Blocks

I have so many things to show you! I have been a busy little sewing bee, but I haven’t had the chance to take pictures of everything yet. I promise to get them up soon.

For today I wanted to show you a few of the blocks that I made for the ‘Bee Creative’ swap I am in. These were for Robin, who had the month of April, but I was a tad late on getting them done as I was lacking inspiration. Robin asked for blocks that represented love and family. She wanted blocks that were a little wonky, and she had no specification on size for the blocks.

http://www.flickr.com/photos/redneckandfairytaleprincess/4500520958/

So I sat down at the sewing machine on Saturday and got to sewing! Since she didn’t have a lot of specific requirements and I could just chop and sew, I decided to make 4 blocks for her. They were quick, but I hope she likes them!

IMG_3970

IMG_3969

IMG_3968

These will go out in the mail for her tomorrow!

Happy Quilting!
Rachel

Posted on

Applique & Free Motion Quilting

I made this little project about a month ago. I picked up a Halloween appliqué pattern, but I have never done appliqué before. I searched all over the web for some tutorials on different methods of appliqué. There are basically two types, needle turn or raw edge. Needle turn means that you leave a seam allowance on the pattern when you cut it, and you turn that edge of the fabric under before stitching. Raw edge appliqué means that the pattern is cut right to the edge. There are numerous ways to attach raw edge, usually fusible is used to keep the edges down, and then you can satin or buttonhole stitch the edge to the raw part does not show. If you don’t mind the raw edges, you can also just stitch with a regular stitch just slightly inside the pattern.

As you can see there are many options when it comes to appliqué, so it took me a while to find one that looked like something I wanted to try. For my first foray into appliqué, I settled on the back basting method of needle turn. You can find the instructions I used here:

Back Basting

It actually worked really well for even the smallest pieces.

Though I have to say I probably won’t do the whole quilt this way. I kind of like the idea of raw edge, and actually leaving the edges raw so they get a little fuzzy when I wash it, but I will have to try that method in another small project to see.

I also tried my hand at free motion quilting on this little project. I have a new machine that lets me do it, and though I am horrible at it, I was surprised that it actually didn’t look half bad when I was done (except that I caught the edge of the appliqué, which I didn’t mean to do!)

Now this super-mini quilt sits on my shelf along with my other permananently displayed Halloween items.

Happy Quilting!
Rachel

Posted on 2 Comments

Geese in the Forest

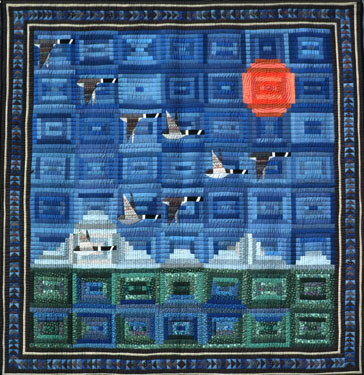
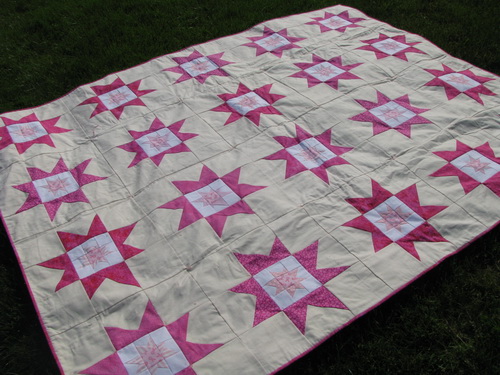
About a year ago, there was a really fun quilt that became popular in the quilting world. You can take a peak at it here:

Liberty Print Quilt

I bookmarked this quilt because I absolutely loved the way the color moved through the quilt, and I thought the different shape triangles were so endearing. Plus it wasn’t “perfect”, which is right up my quilting alley. I wanted to make something similar to this one day, even though I had never attempted triangles before.

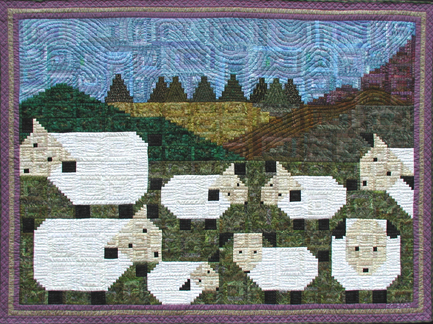
As I said, this quilt was very popular in the community at the time, and one of the quilters on a blog I follow, Twiddletails had decided to do a free pattern for a quilt that was inspired by the one above. She called it “Geese in the Forest.”

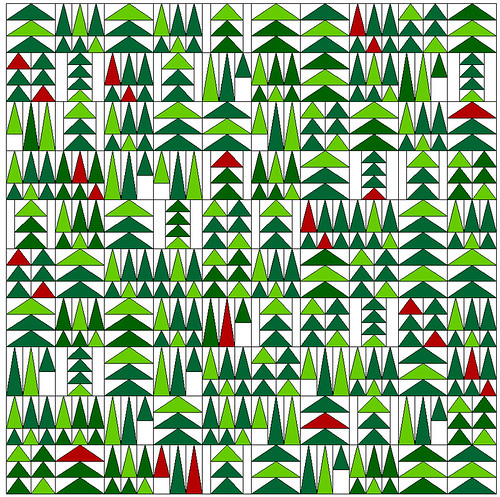
The quilt had 6 paper pieced blocks that would be arranged in such a way as to look random and really does have the feel of the original inspiration. She offered each pattern up for free for one month, and then for only $1 after that. You can find them all still for sale here. I grabbed them when they were free of course as this was perfect for what I wanted to make.

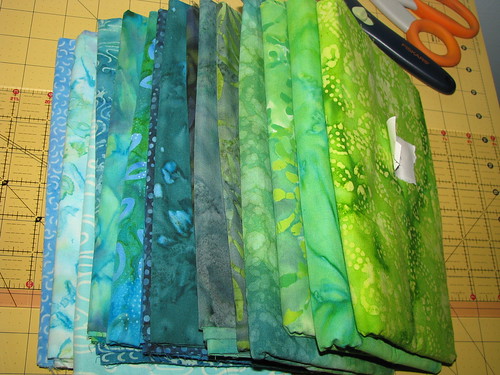
Geese in the Forest (GITF) was designed with green and red in mind, but I was still inspired by the colors in the Tokyo quilt, so I went searching through the fabric that I had. A long time ago I bought an ‘Around the World’ pattern along with enough batiks in green and blue to make a king sized quilt. I never actually got started making that quilt, and decided that the batiks would look great in this design. I grabbed all the ones I thought played well together and arranged them from green to blue.

I then printed out the GITF picture and made a template for how I wanted the colors to run through the quilt. I used crayons and a numbering system to help me keep track of where I wanted each fabric to go.

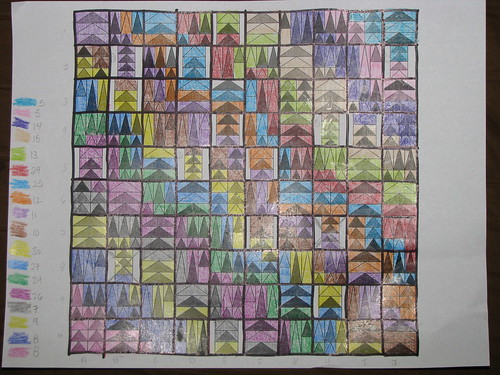
This pattern helped me keep track of my colors because as I said, she released one block style a month, but that block was placed all over the quilt, so it wasn’t as easy as making all the blue blocks first, then green etc… My colors were all over the place, so it was important to keep track of which ones went where.

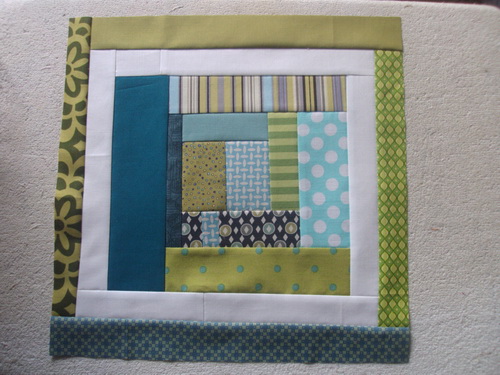
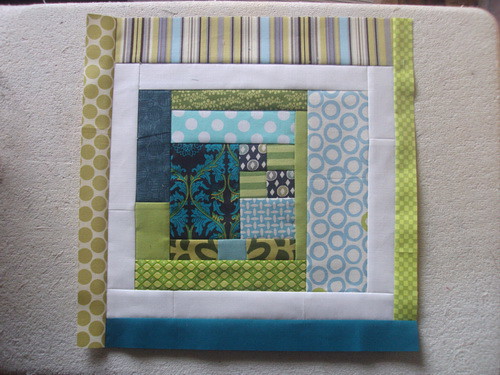
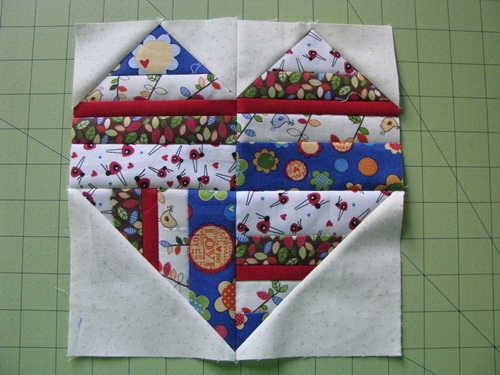
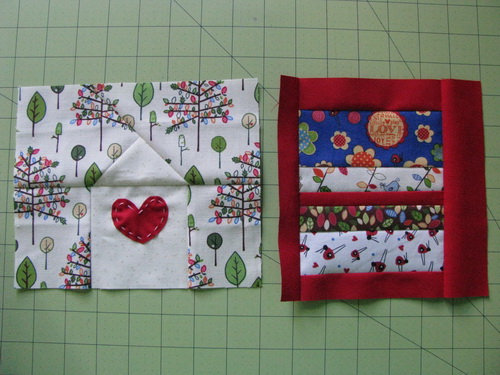
Here are the first 6 blocks I completed:

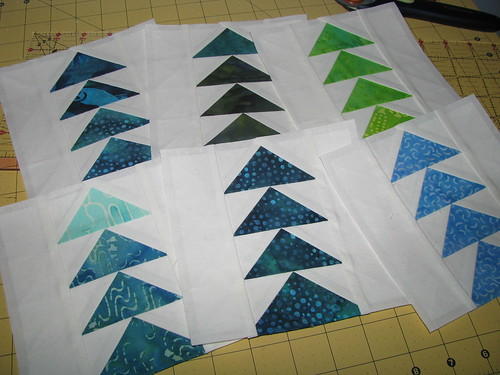
I have done more of them, but I haven’t taken a picture lately. (I will do that sometime soon). The quilt isn’t even close to done, but I figured it would be one that I would be working on for a while. The paper piecing takes a long time to do, so I would say each block probably takes me an hour or two. I pull it out every so often and do a few blocks, so at least I feel like I am making progress. I am just hoping I don’t run out of fabric as none of the fabric I am using was actually bought for this project, so I am not sure if I have enough!

Happy Quilting!
Rachel

Posted on 3 Comments

Breast Cancer Quilt for a Friend

About a year ago I found out a friend of mine had breast cancer. She is doing fine today, but I cannot even fathom having to go through such an ordeal. I was at a loss for what to do for her, so I decided to fall back on my passion and make her a quilt. This is actually the first full blown quilt I have given away to someone outside my immediate family. I used lots of pink and the pattern is a wonky star pattern that was popular at the time. I ended up tying the quilt instead of actually “quilting” it as I was not confident in my ability to quilt it on my machine at the time, and I did not know about Long Arm Quilters then either. I hope that she enjoys it and that it may bring her even just a little comfort.

Happy Quilting!
Rachel

Posted on

Embroidery

I have been fascinated by crazy quilts lately.

All the beading and embroidery is so yummy to me.

I have never really done much more than an outline stitch as far as embroidery is concerned, but I really want to start using this on my regular quilts.

So I decided that I would do some embroidery on my ‘Funky Chicken’ quilt. Since it already had a few beads and buttons for embellishments, I thought it would be a great one to practice this technique on.

For supplies, I just went to Michael’s and bought two embroidery hoops in different sizes, some embroidery needles, and a bunch of colors of DMC floss. Then I went to my favorite places for inspiration, Flickr and Google.

After finding pictures that inspired me, I looked around the web for some websites that would show me how to do the actual stitches. A really good one I found was this one:

Embroidery Stitches Library

I think I will print the stitches out and put them in a binder for better viewing and probably make a sampler with each stitch type on it for practice. But I had fun this past weekend trying out some of these stitches on my chicken quilt. They are by no means perfect, but I imagine as I do more of it, my technique will improve. I will show pictures of my embroidering soon!

Happy quilting!
Rachel

Posted on 2 Comments

Funky Chicken Quilt

So all the blocks came in not too long ago. They were all so adorable!!! I am so happy that I joined this swap. All the blocks were different sizes, so it was a puzzle to fit them all back together. Here are the pictures of the blocks placed together for the quilt:

I have sewn them together already (though they aren’t sewn in these pictures), but I am doing some embroidery on the blocks for something a little different. I will show my progress on it later!

Happy Quilting!
Rachel

Posted on 1 Comment

Funky Chicken Swap

I have mentioned swaps before. In my last post I talked about the first type of swap I am in. Today I am going to talk about another. A few months ago I was browsing the swaps on a quilting forum I visit and I came across a “Funky Chicken” swap. I have a very odd obsession with chickens. I adore them. However, I do not own very many things that have chickens on them. Not sure why, maybe because I want to keep them special? Anyway when I saw this swap I knew I had to join!

For this swap, each participant had to make sets of blocks and mail them into the centralized hostess. Each set was 6 blocks all the same. The blocks could be any size so long as the finished size was divisible by 3 on both sides. We could send in as many sets as we wanted to, and however many blocks we sent in would be how many we would get back.

I ended up making 7 sets (42 blocks), which will hopefully make a good size quilt. Here are a few of he blocks I made:

Happy Quilting!
Rachel