Posted on

The Beginning of the Layout

Last night I put the start of the quilt up on my design wall to check the look of it, I am really happy with it. I picked out some watercolor batik fabric. At first I wanted to go with solids, but I couldn’t find any colors I liked, now I really like this fabric I chose, I think the texture it gives makes it looks much more sky like. I can’t wait until it all comes together!

365 Quilt Top Layout

Rachel

Posted on 3 Comments

More Details on my 365 Quilt

I took some quick pictures of the items I purchased to help me along with my quilt. I started cutting the fabric that I will be writing on last night. (I promise more on the pattern in another post) In order to write on fabric and not have the writing fade with washing or time, you need to make sure you have a special marker. I have not heard good things about the longevity of sharpies, so I would not get those. Everything I read on the web said that the best pen out there is a Micron pigma pen.

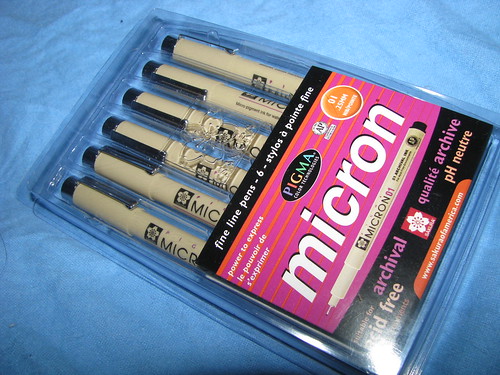
These are easily found at any quilt store, or you can even find them in the scrapbook section of any big box store (I got mine at Michael’s). I tested these pens on a scrap of fabric first, heavily agitated the fabric under running water, and the markings all stayed as they should have. I went with the multi-color pack so I can make some doodles and stuff to to keep the blocks interesting.

Writing on fabric is not always easy. When you write, the fabric tends to bunch up under your pen, so you need to find a way to stabalize the fabric. My first thought was to iron on wax paper to the back of the fabric, but that seemed like a time consuming process that might become a road block to me actually finishing this thing. So I found a suggestion online to get a clipboard and 220 grit sand paper.

All you need to do is lightly press the fabric down on the sandpaper, and it grips it just enough to hold it steady while you write, and the sandpaper is fine enough that it deosn’t interfere with the actual writing either.

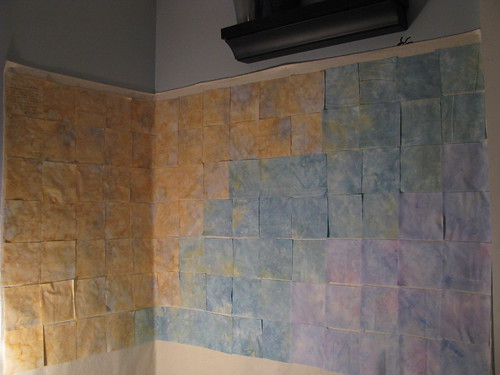
I made up my first block using all these items last night, and it went perfectly smooth! I cut out a good chunk of the blocks I need so I won’t be waiting for those when I am ready to write, I want to make this project as easy as I can for myself to finish.

First 365 Block

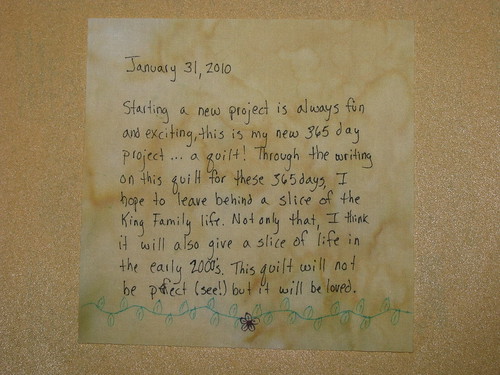
Just remember when you are writing to keep at least a 1/4 inch edge around the block so your writing doesn’t get sewn into the quilt! Some of my doodles will probably go all the way to the edge for interest, but my writing will not.

Let me know if you have any questions!
Rachel

Posted on 5 Comments

My 365 Quilt Pattern

Here is a picture of the pattern I created for my quilt:

Of course if you choose to do a similar quilt, you do not have to use my pattern at all. Next time I post, I will outline the specifics of my pattern if anyone wants to give it a try. But really you could do a quilt as simple as 365 blocks written on and sewn together. No matter what it looks like, I will be special to you and your family.

I have also started a Flickr group for my project so all my pictures will be grouped together. It can be found here: 365 Day Quilt Maybe I’ll even get around to making a bloggy button or something too. πŸ™‚

Remember if you do decide to take this journey, you can start any day of the year!! So long as you go 365 days, it doesn’t matter when you start. My first official block was January 31, 2010, so not a special day at all. πŸ™‚ By the time you are done, you’ll have a real slice of your life all sewn up into a quilt.

Cheers!
Rachel

Posted on

A New Year, A Whole New 365 Project

Well if you couldn’t tell by my sad little blog, I failed miserably at my 365 pictures for 2009. Though I did make it farther than the last picture I posted on the blog, I didn’t make it even close to the whole year. But that was so 2009, and now it’s 2010. A new year, a new 365 project.

This year I am trying something completely different. I am not sure how much posting of it I will do, but if you want to join along that might be fun! I am making a 365 day quilt. I will journal on one quilt block for each day for 365 days. This project is more appealing than the picture one because I can jot notes down in my journal and fill in all the blocks on the weekends. Not something you can do with pictures. I think this will be a wonderful heirloom once it’s done.

For this project I have designed my own quilt, I will show you the design and some of the fabrics I have already picked soon. This will be a fun journey I think and maybe someone out there in blogland will read my little blog here and perhaps join along?

Cheers!
Rachel

Posted on 1 Comment

Stripey Quilt Formulas

The quilt I was basting above was inspired by a quilt that was made by Finn Leah, who was inspired by Jane Weston. It’s a super easy stripey quilt that involves a bit of math to get the quilt to be the size you want it to be. Check out those two links to get the idea of HOW to sew this quilt. Below is the math for you to figure out how to cut the fabric and sew the intial strip. If you decide to try this one out, I’d love to see it!

I am a math person, so hopefully I can explain this well. First off, remember that your quilt will always have to have 8, 16, or 32 strips (unless you want to add more on the sides). Let’s say we want 16 strips. Next, determine how wide you want your quilt to be. So let’s say we want it to be roughly 60” wide. Now we divide 60” by 16 strips and we get 3.75, that is how wide our strips have to be after seam allowance if we want a 60” top. So you would cut the fabric to 4.25” to account for seam allowance. Now you determine how long you want your quilt to be, so let’s say we want it 90” … to get how long our super long strip should be, we multiply the number of strips (16) by the ending length (90”) and we get the length go our initial strip … 1440” .. So if we cut a 1440” strip that is 4.25” wide, we will end up with a 60×90 quilt.

So to recap:

You Choose:
Width of Quilt desired = X
Length of Quilt Desired = Y
Number of Strips Desired = Z (Must be 8, 16 or 32)

Calculated using formulas below:
Width of strips w/o seam Allowance = A
Width of strips w/ seam Allowance = B
Length of First Strip that is pieced = C

X / Z = A

A + .5 = B

Y * Z = C

Now go cut B sized strips and piece them together to from a length of strip that is C long, and sew as directed and you have your quilt!! πŸ™‚ πŸ™‚

Please let me know if that helps you and your readers!

If your A (strip size w/o seam allowance) size is not a nice even number, you may need to change your quilt width by a few inches either way until you get a number you are happy with!

Rachel