Posted on 1 Comment

Funky Chicken Swap

I have mentioned swaps before. In my last post I talked about the first type of swap I am in. Today I am going to talk about another. A few months ago I was browsing the swaps on a quilting forum I visit and I came across a “Funky Chicken” swap. I have a very odd obsession with chickens. I adore them. However, I do not own very many things that have chickens on them. Not sure why, maybe because I want to keep them special? Anyway when I saw this swap I knew I had to join!

For this swap, each participant had to make sets of blocks and mail them into the centralized hostess. Each set was 6 blocks all the same. The blocks could be any size so long as the finished size was divisible by 3 on both sides. We could send in as many sets as we wanted to, and however many blocks we sent in would be how many we would get back.

I ended up making 7 sets (42 blocks), which will hopefully make a good size quilt. Here are a few of he blocks I made:

Happy Quilting!
Rachel

Posted on

New Digs

I decided to move my blog away from blogger, I like to give my blogs their own URL, but since I never really used this blog before I just kept it on Blogger. But I like updating this thing, so what the heck …. Here are my new digs! Feel free to book mark the new site, I’d love to see you around!

Happy Quilting!
Rachel

Posted on

More Journaling on the 365 Quilt

Just a quick update on my 365 Quilt! I have been doing good about keeping up with my journaling ideas for each day on paper, and I write a few blocks each day to try and catch up on fabric. I went Scrapbooking with a friend this past Friday, but instead of scrapbooking, I wrote out a bunch of my journal blocks. I go more for the company anyway, so it was good to get close to caught up. I have blocks through April 1st written now. Here are a few more of the journaling I have done, I will add the rest soon!

March 6 – Got our tax refund – Shopping Spree!
March 7 – Visiting my Mom
March 8 – My son buying 3 Nintendo DS games
March 9 – All about our cat Whiskers
March 10 – Doing our calorie diet
March 11 – My son watching Spongebob Squarepants
March 12 – Eating at a new Pizza place in town
March 13 – Watching the new movie, Alice in Wonderland
March 14 – My son’s first sleepover at a friend’s house

I hope these give you some ideas for your own quilt if you plan on making one! It’s fun for me to look back at these even now as I have already forgotten much of it. I am very excited to see this whole quilt come together.

Happy Quilting!
Rachel

Posted on 7 Comments

Grandmother's Garden

When I was in high school, I had to do a senior project. I decided to learn how to sew. I chose my grandmother as a mentor for the project. I learned a lot, but one of the best things she did was give me a beautiful quilt that was unfinished. It was a grandmother’s garden quilt. The quilt was in various stages when I got it, and I was only able to work on it a tiny bit at the time. When I went off to college I packed the quilt away and it has moved from place to place with me for the last 10 years. I finally pulled it out a few weeks ago to look at it again.

There are a few parts to this quilt. First I have the parts that are already sewn together.

Then there are the flowers that are done, but not attached yet.

And finally the small shapes that will eventually make up more flowers, but are not sewn to anything yet.

The fabrics are beautiful.

I asked for some help dating these fabrics on a quilting board I am on. Most people seem to think the fabrics are from the 30s. I pulled a few of the newspaper centers out of the parts that didn’t need them anymore to look for a date. I found a 1931 date that looked like an advertisement for farm equipment. This tells me that it was put together right around that time, so it would make sense that the fabrics are from that time too.

I love this quilt though it has to be pieced by hand, so I don’t know how much of it I will get done any time soon. But if I do a little bit here and there, hopefully one day I can finish what was started in 1930.

Happy Quilting!
Rachel

Posted on 2 Comments

Bee Creative Swap Blocks – March

I used to do a lot of swaps when I was a part of online scrapbooking communities, but since I have gone digital with my scrapbooking, I haven’t been a part of any swaps. Recently I joined a quilting community, and found swaps again! I have been very into sewing lately (my passion for one craft or another comes and goes), so it has been fun to join a few swaps and see what other people create too.

If you have never done a swap, there are a few kinds. I will outline quickly the two types I am in now.

The first swap has 12 members. Each member has a month. When your month comes up, you send a packet of fabrics to each of the other 11 members. You tell them the type of block you’d like to see (size and style), and they make it for you using the fabrics you sent and their creative ideas. Once completed, the 11 members send their blocks back to you and ideally when done you have a completed top. In the months that you are not the chosen member, you will be on the receiving/creating end. It’s a lot of fun, and you get a whole coordinating top using techniques you yourself may not know how to do!

The second type of swap is more similar to the type of swaps I used to do when I did scrapbooking swaps. These swaps have a centralized hostess. The hostess will choose the theme and style of the swap. Then members sign up, some swaps have limited spots, but most allow for any number of members. Each member makes blocks in the style the hostess has set, usually in sets of 6 or 12, sends them into the hostess, and then they get all different ones back (so if I send 12 blocks, I get 12 different ones back). Each member uses their own fabrics to make the blocks. This type of swap gives more variety than the last one, since it’s not all the same fabrics. These are also fun because they don’t involve a one year commitment like the first.

I am currently involved in a few swaps, but the blocks I want to share today are from the first type of swap. The name of our group of 12 is “Bee Creative.” The first girl that had March sent us lovely Kona solids and asked for sharp lines, no wonky. Here are the two blocks I created for her.

I am not usually a straight line kind of gal, so this was out of my comfort zone, but I still had fun making them for her.

Happy Quilting!
Rachel

Posted on 1 Comment

Bow Tucks Purse

Last weekend I worked like a little worker bee on a purse. Having never made a purse before, I wasn’t really sure how it would go. It ended up working out really good though! I was pretty impressed that I ended up with a purse I am actually proud to carry around with me. I love purses, but my problem has always been that I can’t find a fabric I like when buying one. Now that I have made my first purse, I think I might be making all my own from here on out! I can pick my own fabrics, make the pockets the size I need them, and I can be proud that I did it myself!

Here are some pictures. This is an every day purse that carries all my stuff. The pattern I used is called “Bow Tuck,” it is a pretty hot pattern right now. We have it listed in our store, Dewberry Lane for $8.10.

This first picture is the front view.

A side view, my bows ended up a little short, but I think I like them that way actually.

An inside view, I had a lot of fun making the pockets just the right size to fit everything I carry.

A close up shot of the beading I did. The pattern calls for quilting, but I wanted to do something different, so I stopped by the bead store and got some little flower beads and sead beads and put these on instead of quilting the outside.

Happy quilting!
Rachel

Posted on 2 Comments

This Week's Journaling

I bet you thought I had given up on this project already!! Not a chance. 🙂 As I stated, this project is so easy because I can just jot down a thought or activity from the day on a piece of paper and go and write about it later. I spent some time this morning catching up on my blocks. I still have 3 more to do, but I wanted to come here and give you a list of my journaling so far:

Feb 21 – Buying fabric with Kolby for him to make a quilt
Feb 22 – Our freezer defrosting
Feb 23 – Going to our favorite sub shop
Feb 24 – My son playing his Nintendo DS before bed
Feb 25 – My son going swimming at the Y
Feb 26 – My son’s “girlfriend”
Feb 27 – My husband’s Civil War reenacting meeting
Feb 28 – Going Bowling
March 1 – Reading a “Spooky I Spy” book with my son
March 2 – Forgetting my lunch & money at home
March 3 – Eating Lean Cuisines
March 4 – Playing War with my son
March 5 – My house is a sick ward

As you can see, I have a good mix of exciting activities and more mundane ones. All together this wide variety of journaling will give a true picture of our life this year.

Happy Quilting!
Rachel

Posted on 1 Comment

Pictures!

Finally got a few pictures of my quilt, nothing too exciting, but it will show you my progress anyway. I have the first row of the quilt all written on and I am starting on the second row now. I have a good idea of how I am going to finish this quilt that I will share in another post soon.

Here is an overall picture of the quilt qhere you can see the top row done, and how I started on the second row:


You’ll notice that the third block in has my son’s writing, I am going to have him do this a few times on the quilt, but especially towards the end so we can see how his writing changes in just one year. The second block in has my husband’s writing on it too. I think it’s good to have both of them be a part of this quilt.

Here are two close-ups of blocks:

If you’re working on this project too, I’d love to see pictures!

Rachel

Posted on 1 Comment

Week Three Journaling

This week just flew by!! Luckily it was easy to write my blocks after the fact this week, and I was able to get all caught up this morning. I know this quilt will be a really special thing for me since when I write this post, even just a week later, I have already forgotten what I wrote about. I can only imagine how special it will be at the end of this year when it’s all done or even in 5, 10 or 15 years. This is a really simple project that I would highly encourage for everyone. You don’t even have to make the blocks as big as mine if you aren’t great with journaling!

Here is my journaling for the week three:

1. Valentine’s flowers from hubby
2. Taco night
3. Snow day
4. About our kitty, Ciao
5. My son doing homework
6. Srapbooking & surprise flowers from Kris
7. Annual meeting for our reenacting group

Anyone else all caught up?

Rachel

Posted on

Journaling for Week Two

I will get a pic of the blocks soon, but I just finished writing up the final blocks for week two! Two down, 50 to go!! 🙂 I really like that I can jot down notes from the days and write the blocks later if I want to, it makes this project so much less pressure!

Here is my journaling for the week two:

1. Superbowl square with names written by each person at the party
2. Schedule of our night
3. My Grandmother’s Garden quilt
4. Surprise snacks brought home by hubby
5. Hubby’s second job at Blockbuster
6. Our budgeting system
7. Son’s first sleepover

So are you caught up? I’d love to see what you have done so far!!

Rachel

Posted on 2 Comments

Journaling Week One

So I have been good this week and kept up with my blocks, I will try and post what I journal about each week to hopefully give you some ideas if you are following along!

Here is my journaling for the first week:

1. About starting this project
2. Hubby’s journaling about his flat tire
3. Son’s name written by him, and explanation of his reward chart at school
4. My son being sick today
5. Working overtime at my job
6. My favorite snack & hubby making dinner
7. Hubby overcooking breakfast

As you can see none of these things are overly exciting parts of my life, but I think it will be exciting to read it all later. As a whole, this quilt will give a true slice of our lives together.

Let me know if you have started on this project yet and what some of your journaling has been!

Rachel

Posted on 1 Comment

My 365 Quilt Pattern

I first learned about this project idea when I found this blog post randomly in my blog reader: The 365 Challenge The idea of it struck me right away as I love to journal and I love quilting. I believe Leanne had her squares finish at 4 inches square, which made her a queen size quilt. She went with an array of tan neutrals for her blocks as well.

When I decided to do this quilt, I want to make an actual pattern for my journaling blocks to sit it. Nothing too complicated since the writing would be the main focus. I came up with the idea of having houses because this quilt represented my family and our home and our life together. Plus I have loved all the houses that have been popping up around the quilting community lately.

Once I knew I would do houses, I tried to think of a way to incorporate the houses into an actual scene, a grassy hill with some trees was what came to me next, partially inspired by this mini: Four Seasons So the idea was born! A sky, a hill, some trees and houses. A great little neighborhood to house all my words for a year.

So here again is the pattern I created:

365

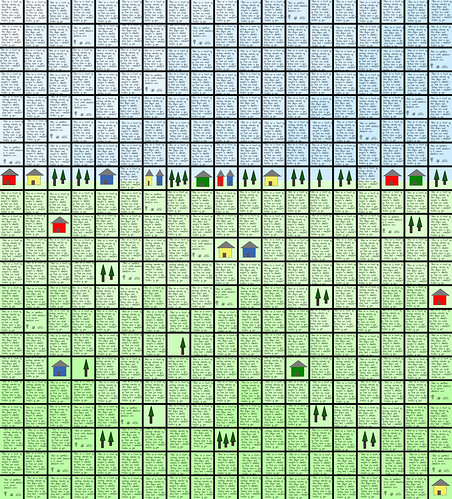
I am by no means a pattern maker, but I will do my best to explain it to you. please feel free to ask questions though!

There are 399 squares in this quilt, they are arranged 19 x 21 and each journal square finishes to 4.5 inches. With a 1/2 inch sashing, the quilt will finish to a King size. 365 of the squares are journal blocks, and 34 are going to have houses and trees in them.

Sky Portion
I chose to do my sky in 3 colors that kind of blend through each other, you can stick with one color if you want as well. If you go with 3 colors, pick 3 shades of blue/yellow that go well together and split the total number of blocks you need into 3. You will then arrange the colors in the sky in a step pattern to give it interest.

Cut 133 total 5 inch squares from blue (finishes to 4.5 inches), these are your sky journal blocks.

The row of houses between the sky and grass, will also need some sky fabric, but this will be used when you make your actual houses and trees. So be sure to pick up extra of each sky color to accommodate.

Grassy Hill Portion
My hill is also going to be in 3 color gradation with the darkest at the bottom. Again if you choose to do this, just split the total number of blocks into about 3 and arrange them in a step pattern for visual interest.

Cut 230 total 5 inch squares from green (finishes to 4.5 inches), these are your hill journal blocks.

Once again you will need extra green to use around all the house and trees not only in the line between the sky and grass, but also on the hill itself. You will probably need more extra green than you will need extra blue, since there are more houses and trees here.

Line Between Hill & Sky Portion
This part of the quilt has a good number of houses and trees in it, but I also have 2 journal blocks here. I have not figured out how I am going to do these blocks yet since I want each block to show a bit of the grass and sky. Once I get to the actual making of these blocks I will post a tutorial, but if you feel comfortable winging it yourself, by all means please do!

Trees and Houses
I have never actually attempted to make trees or houses out of fabric yet, but I was hoping to either find a good tutorial or I would just wing it. (Can you see a theme for me yet?) Maybe I’ll attempt making a house and some trees today using scraps and put a tutorial up on here for you soon. Keep an eye out! There are 34 squares that have trees and houses in them, 17 of which are in the row between the grass and sky.

For fabric for the houses, you want fabric for the roof, the body of the house and the door. I went with gray for all the roofs and brown for all the doors, but picked 4 different colors for the bodies of the houses. Then for the trees, I got green for the body of the trees and a different brown for the tree trunks. All my trees will be the same color combinations.

Black Sashing
I am still undecided on whether I am going to do the sashing or not. If I do not, my quilt will end up being smaller than a King size. The sashing will be a 1 inch stips between all the blocks. There are many ways to add sashing, which I will go over later on. This will be one of the last things we do once we are ready to put the quilt all together.

Buying Fabric
I ended up buying about 5 yards total for the sky (this was split between 3 colors), 1 yard for the roofs of the houses, 1 yard total for the house bodies (split into 4 colors), a quarter yard for the doors, 1/2 yard for the tree bodies, and a quarter yard for the tree trunks. I am still looking for green for the hill, but I estimate I need about 8 yards (split between 3 colors) for that. Please remember I have never made this quilt before, and I am not a pattern maker, so my fabric estimates are just that. I tend to overbuy my fabric to be safe and I always seem to find a use for the extra later. 🙂

I hope this helps you out with my pattern. I am sorry I cannot be more fancy with it, but as I said I am by no means a pattern maker I just make this stuff up as I go! I am planning on getting EQ6 very soon, so maybe I can use that to make a true pattern for this quilt. If it works out I will post many more specifics using that later.

If you click on the picture of the pattern, you will be taken to flickr where you can view the pattern in a large size. Please feel free to print it out.

Also please remember you DO NOT have to use my pattern to make this quilt. You can do as Leanne did and just sew neutrals together for journal blocks, or there are quilt patterns out there that lend themselves very well to journaling, like how about a small version of a snowball block? If you want to use my pattern I would be honored, but do not feel obligated to do so!

Happy Quilting!
Rachel